Wednesday, December 10, 2014

Floral Strings: A Finished Quilt

Whew... too many days away from the blog!  Here's a post I meant to write weeks ago about my floral strings quilt.

With quilting, we there are standard sizes of quilts that fit into different categories (i.e. twin, king, etc.).  Sometimes, however, we break those rules and often it yields interesting results.


My floral strings quilt is no exception.  I've decided that the size is odd since it's a bit "too long" for the overall width.  The description "elongated baby quilt" is freely used, although I'm sure it could pass for a bed runner.  Despite the odd shape, I'm quite proud of it.

Why?


I'm proud because I used items from my stash to make it and didn't buy anything new.  I didn't succumb to my artistic whim that was demanding a chartreuse binding when I didn't have any fabric in that color.  I didn't run out and buy extra yardage for the border, I just used some extra of the fabric to lengthen the border.  This project was started just before our last move as an effort to reduce the fabric stash.  (Truth is that it didn't work because I ended up packing the top instead!)  

All that being said, it's a pretty quilt!

Here's a picture taken during bright sunlight to show off the wonderful texture.
 

The local quilt shop quilted it using an off white thread in a daisy chain pattern.  Fabrics are from Joel Dewberry's Nottinghill Collection and others from my stash.

Tuesday, September 23, 2014

QMQ Quilted Name Tag

The last week I've made some slow, but steady progress on a few projects.  Two of them are gifts, and well, I'm not very good at surprises.  Are you?

Truly, I am doing to try my best to keep them under wraps.  Just ask my sister, I am horrible at keeping gifts a secret.  I'm typically so excited about the gift that I just can't help but share / give the gift early.  Any one else struggle with this?

However I have a small project that I can share today: my quilted name tag.

For the past year or so, I've debated joining my local Modern Quilt Guild.  It's always been appealing, but there's always an excuse or two that's kept me from joining. However, last week I took the plunge!

In my excitement, and to help calm some nerves, I made myself a simple quilted name tag for my first meeting.


It features a few of my favorites things:
1. Blue
2. Bonnie & Camille Fabric
3. Blue
4. Simple quilting
5. Hand-sewn binding

I even tried embroidery, which is a new technique for me.

All in all, I'm pretty happy with it!

Tuesday, September 16, 2014

The Art of Being Me: Interview of Me!

Today I'm being featured as a part of Mastering the Art of Being Me's  interview series "Art of Being You."

I met Shannon while attending Sewing Summit last year.  She's a wonderful, genuine person with a great eye for color and style.  I feel pretty lucky that I get to participate in this series.  So jump on over and learn a little bit more about me!  You can follow the link HERE.

For those who are stopping by for the first time, I hope you enjoy your time and find some inspiration!  There's a tab at the top that feature's Tried and True Tutorials, where I've linked tutorials that I've used and loved, giving credit to the authors.


I'll leave you with a few random recent shots.


Thanks for stopping by!

Tuesday, September 9, 2014

Samurai Star: Finished Quilt

There are times when an idea strikes and then things just slide into place.  This was one of those projects.


Like some of you, I sometimes struggle with making "boy" quilts.  I've had some success with Jeni Baker's Modern Plus Quilt tutorial (see mine here), but wanted to try a new pattern.  I jumped over to my Pinterest page and remembered the Samurai Star tutorial from Amanda of A Crafty Fox (and Westwood Acres fabric shop).  As I went through my fabric stash, I remembered a bundle of fabric I bought from Jack and Lulu's London Calling line.  For me, the pattern and fabric were a great combination, though a bit busier than my usual taste.


The back of the quilt features some scraps of the front fabrics.  I think this is one of my favorite details to add to a quilt.  The quilting was kept simple with some hand-quilting around each of the stars.  I used the turn over edge of the backing for the binding which was hand-sewn.

I finished the quilt while vacationing in Utah and loved getting some pictures with greenery in the background.  Special thanks goes to the husband for helping me take pictures!


The quilt made it's way home to one of my nephews and I know it will be well loved!  Isn't that the point?

Plus, it's also very flattering to have the designer comment on your finished project.


Tuesday, September 2, 2014

Noodlehead Supertote: Is it really that super?


Last year I picked up the pattern for Noodlehead's Supertote and finally made one a few weeks ago.  It's a very popular pattern because frankly, it lives up to its name.  It truly is super!  Let me explain:

1. Directions are amazing. Once you've picked out your fabric, it's a fairly quick sew.  There are great illustrations and clearly written instructions.  If you've never sewn a zipper before, don't sweat it, you can do it.

2. The tote can hold a large amount for its size.  During a recent vacation we went vinyl record hunting on our way to the airport to catch our return flight.  The tote already contained my hexagon travel kit, bottle of water, iPad, electronic chargers, fabric, large wallet and a few other miscellaneous items.  Yet I was able to fit records and still zip the bag closed.


3. The possibilities of color combinations are endless and the tote looks wonderful either with a few fabric selections, or tons of patchwork.


Now that I've sung its praises here are a few lessons learned from my Supertote experience:

1. Use all the interfacing that you can.  Ok, well maybe not ALL the interfacing that you can, but when in doubt, use the interfacing.  With mine I did quilted exterior panels but did not add interfacing and wish I had.  I used denim for the gusset and handles, but wish I had added an additional layer of interfacing or used a heavier weight of interfacing.  I love my bag, but it doesn't have the structure that I want. There are great instructions in the pattern regarding the interfacing.

2. Don't be afraid to do it.  Seriously, the hardest part was picking the fabric and figuring out where each which piece went where on the bag.  I've never sewn a bag this complicated and have to admit I had to look up the word "gusset."  It is a great bag with clear instructions.

3. Do a "noodlehead supertote" search on the internet (or check out the Flickr group) to get tips and ideas.  There is a wealth of knowledge and inspiration available.


All in all, it truly is a super tote and lives up to its name.  I recommend you try it for yourself!  You can buy the pattern here.

What are your favorite bag patterns?  Or do you make your own patterns?

(Please note that I am not affiliated with Noodlehead and did not receive any compensation for this post.  The ideas and thoughts are my own).

Tuesday, August 26, 2014

Red Cross Inspired: Finished Quilt


Back in June I volunteered as a Girls Camp Director for a five day camping trip with 21 teenage girls from my church.  It was a fun, crazy, hormone-filled adventure with plenty of amazing moments. 

Each year we have a theme and this year it was centered around medical professionals.  A Red Cross flag was hung at the main gathering area as one of the ways to reinforce the theme. Our fearless leader planned the entire week to be full of great activities including archery, hiking, crafts and skits for over 150 young women.  She is an adored leader who shares her spunky, caring, contagious personality and her heart with us.  For all of her efforts, I decided to make her a quilt!


I used a combination of reds from my stash, including some of my beloved Happy Go Lucky to create the red cross and then used a basket-weave pattern of creamy low volume prints for the background - I love how this turned out!  The border is a muddled red from my LQS with the binding from Bonnie & Camille's Marmalade collection.


I again went with the champagne bubbles for the quilting with a parchment colored thread.  Quilting by my local quilt shop, Cutting Edge Quilts.


My favorite part is all of the reds and how they play off each other.  By far, fabrics are my favorite part of quilting.  What's your favorite part of quilting?

Friday, August 8, 2014

Samurai Star Block: A Tried & True Tutorial

Hello All!

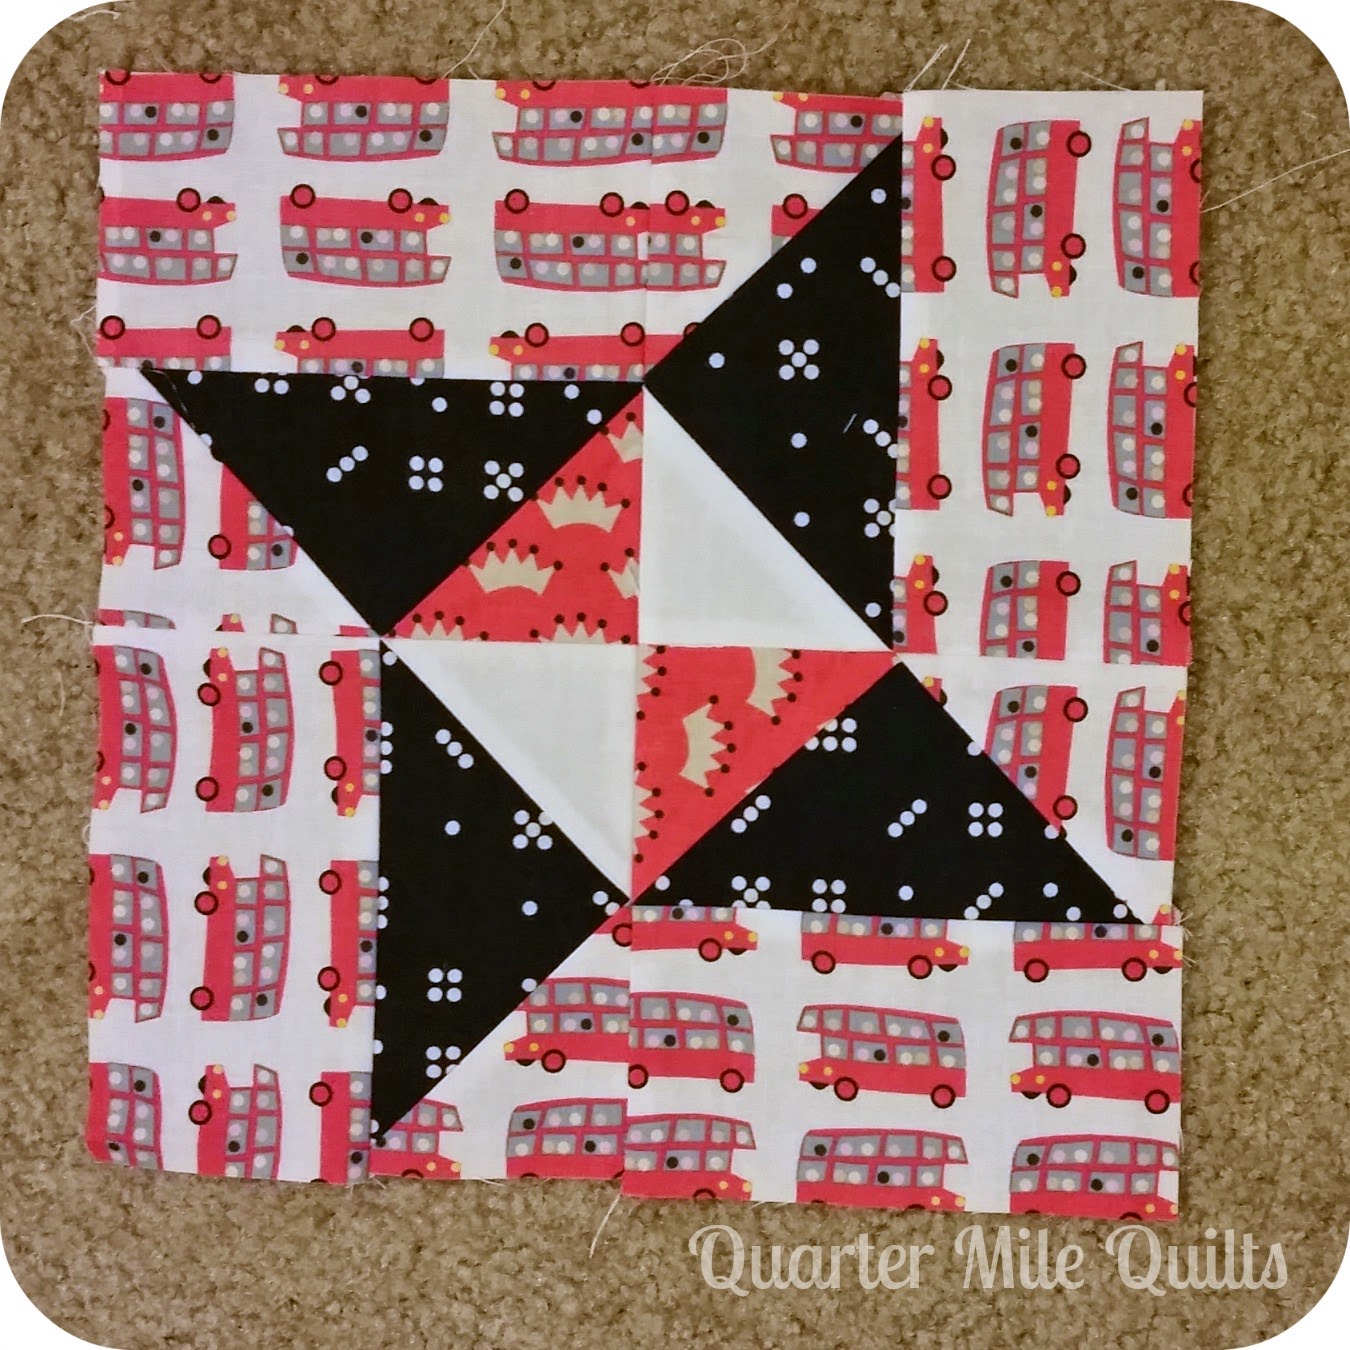
Today I've got another installment of my Tried and True Tutorials: The Samurai Star Block from A Crafty Fox.


This is such a great pattern and works well for boy quilts!

I used my fabrics from Dear Stella's Jack & Lulu collection called London Calling. It features some fabulous London novelty prints.  I think the double decker bus is my favorite print! (you can find some of the print here) I also used some solids as well as my favorite Waterfront Park domino print.


The blocks are quick to come together and give a great impact!  If you do not have any experience with the flying geese block you should definitely give the Samurai Star Block a try.


Still piecing the quilt top together, but I couldn't wait to share this Tried and True Tutorial with you.

Wednesday, July 30, 2014

Layers of Hope, Quilting 911


To all of my quilter friends, I wanted to pass along a need that is in our quilting community.  I know that everyone is in a different position, but wanted to share in case anyone had the capacity.

Layers of Hope, Quilting 911 is an organization set up in Washington that helps support First Responders during emergency situations.  They share their donated quilts with those who respond first to our needs.  I have supported this organization in the past when I made my Green with Envy HST quilt for the families of the firefighters affected in a devastating fire last year in Arizona.  I can testify that they're a legitimate organization.

At this time they're looking for some Queen Sized quilt donations for the people who have lost their homes in a large fire in Washington (at least 400 families).  If you can help, please use the links below for contact information and how you could help if you are unable to send a quilt (i.e. funds for postage, materials, fuel to deliver quilts).

Website with Address Information and how you can help

Facebook Page

Tuesday, July 22, 2014

HST Sample Quilt: Finished!

Confession: I have a bundle of "Quilts to be Bound" stuffed neatly next to my bed.  During a recent cleaning episode, I decided that I wanted to clean up that space and proceeded to prepare bindings.  First to complete was the Kentucky Derby Quilt and then I moved on to my HST Sampler quilt.


The bright colors inspired by (ahem*) my favorite pajama bottoms yielded this bright beauty.  I chose a aqua teal for the border and then chose to use a lipstick pink (Kona) for the backing and binding.


Question: Even though I thoroughly washed the fabric, I'm still a little leery of giving away this quilt.  The main print comes from a pair of "well-loved" and in great condition pajama pants.  Would a quilt made from someone's pajama pants be gross or weird?  Or is it just like when people made quilts from old clothes?

Finished size: 55" x 55"
Quilting by: Cutting Edge Quilts
Quilting Pattern: Floral Chain in thread color Parchment

If you would like to read more about the construction of this quilt you can read the following posts:

HST Sampler Finished Quilt Top
HST Sampler Pinwheel Block
HST Sampler Star Flower Block
HST Sampler Bowtie Block


(I feel like I keep saying that I'm addicted to blue, but I keep presenting finished quilts that are outside my addiction.  I still "struggle" with my blue addiction, but lately I've been committed to finishing my WIPS.  Shhhh... I have two blue quilts ready to be cut!)

Thursday, July 17, 2014

And the race is on... Kentucky Derby Quilt Finish!

They're coming down the back stretch it's Odin's Hammer with Grease Lightning and Southern Drawl right on his tail...Now Odin's Hammer and Southern Drawl are neck and neck, but wait here comes Lucky Charm out of nowhere it looks like it could be a photo finish folks... and the winner is Lucky Charm!


Ok, thank you for the crazy introduction.  As you can tell I'm so excited that I finished my Kentucky Derby Quilt.  It's been a long journey (you can read about how I messed up my math here).  I've had this quilt ready to be bound for nearly six months.  It was a quilt without a deadline and the math errors still haunt me, in a good way.  I measure six times and then cut once these days.


It is by no means a perfect quilt, but I am so grateful for the lessons that it has taught me.
1. There's no harm in trying something even if you don't have a pattern!
2. Measure twice (at least!)
3. Enjoy the process

My grandparents grew up in a small town and every year there is a family reunion that includes a trip to the County Horse Races.  My grandfather gloats about how my grandmother was the Dairy District Derby Queen.  We also place quarter bets on the horses and (much to the chagrin of my mother) win "a bunch of money." This is according to my then five year old sister who announced this at church one Sunday.


Quilt features the horse panel print from Joann's that was found in the remnant section and with the rest of the fabrics coming from my stash

Quilt measures: 56" x 56"
Pattern: Classic Star Block with an additional inside border.

Tuesday, July 8, 2014

Sewvivor - Quarter Mile Quilts - Kate Gunther

Hello, All! I've decided to audition for Sewvivor hosted by Family Ever After!  As many of you can imagine, it was hard to pick a project for my audition. Drumroll, please :)

My Happy-Go-Lucky Baby Quilt:


I decided to choose one that highlights a few of my favorite things:

1. The Color BLUE.
I am hopelessly addicted to the color blue.  I joke that even my husband's eyes are blue!
(See full post dedicated to the 12 Step Program for Color Addicts - QMQ style!)

2. Favorite Fabrics. 
Highlights one of my favorite fabric collections: Happy Go Lucky from Bonnie & Camille with Moda

3. Hand-quilting
I love hand quilting and the effect it gives a quilt.  To help the "beads" shine, I choose to keep the hand-quilting simple and outline each of the beads in a simple straight stitch.  The pieced border also has a bit of hand-quilting along the edge.

4. Giving Away Quilts
I love giving away my quilts and this was no exception.  I was thrilled to hear my best friend was expecting and so a beautiful baby girl named Grace is the happy recipient of this quilt.


Pattern: Squares and hour-glass blocks created this beaded design.  The piano key / squares border was a late addition after seeing: Pixels to Patchwork's project here. She did a fabulous job! 

Machined pieced and hand quilted by yours truly.  Binding was hand sewn using the backing folded over and hand-sewn.  Finished quilt measures roughly 38" x 46".

Interested in auditioning, too?  Jump over to Family Ever After for all the information! 


Tuesday, June 24, 2014

V and Co's Modern Miss: QMQ Results

As soon as I saw Vanessa Christenson's post about her Modern Miss pattern I knew that I wanted it.  Do you ever have that sudden impulse that you NEED to make a certain quilt or pattern?  This impulse was pretty strong.  I went out the same day (Thursday) and bought the magazine. Then on Saturday I bought the background yardage jumped in Saturday evening.


And behold, a finished quilt top by Sunday afternoon!


It is truly a quick and easy quilt pattern.  If you're a beginner quilter, you should have this on your to-do list.  It has flying geese, half square triangles and squares, with great instructions on how to create each.


Since Sewing Summit last year, I've been holding on to some bright pinks and purples. 


I'm still a little intimidated by the pinks and so chose to use the purples for this project.  I am fairly happy with the results, but think my color choices could have been a bit better.

The nice thing is that I can re-create this project fairly easily and without a whole lot of heartache since it comes together so quickly.  This pattern has me thinking about opening a shop to sell quilts in this pattern... but maybe not.  I could write a whole series on my internal debate on selling quilts.

Thank you, Vanessa for an amazing pattern!

Now, I have to decide how to quilt it...

Friday, June 20, 2014

Finish It Friday: Marmalade HST Quilt

Over Christmas vacation I took some time to teach my amazing sister in laws how to make half square triangles.  Since we were all traveling to sunny California, I safely packed my Singer Featherweight and two charm packs for the journey.  (One charm pack of Bonnie & Camille's Marmalade line and the other of Bella Solids White)

During my hiatus from blogging, I took some time to bind this beautiful quilt.  The result:


Love how this came together and the bright binding.  I found the border and backing on sale at my local quilt shop (LQS) and am happy that it all works together so well.  Quilting pattern is "Chain of Daisies" from my LQS.  Binding is a Kona green, I think it's "Grass."

This quilt is destined for the next baby girl born on this side of the family.  How awesome would it be to have a quilt that all of your Aunts worked on?

Another finish for Finish it Friday!

What are you working on?  Here's a little encouragement from me: "You can do it!  Finish that quilt!" ;)

Wednesday, June 18, 2014

Simple & Effective: Wee Wander Quilt

Here is my simple, yet effective Wee Wander Quilt that I made for my 8 year-old niece.


I love the simple design because it alternates between 6" strips of patterned fabric and 2" strips of Kona White. I love how this let's the colors and patterns of the fabric shine.

I hand-quilted this little number with some coral-colored pearl cotton.  It can be pretty tough to hand sew through minky, so quilter beware :)


This quilt is simple in design and effective because of how it lets the fabric be the star of the show.  It was also simple and effective because while making this quilt I needed something simple. 

All in all, the most important thing is that my niece loves it!


Thank you all for your kind comments and emails about my quilting anxiety in the last post.  You've all offered some great advice and I've started to implement a few of your suggestions.  For example, I don't check my blog feed every night (trying the suggestion to just read on Fridays/Saturdays) and I've skimmed back on my participation in blog link parties.

I've slowly started to re-enter blogging and emailing.  If you follow me on Instagram you'll see that I've started quilting/sewing more frequently, usually in small 1/2 hour bursts on the weekends.

Wednesday, April 16, 2014

Behind the Kate

Lately I've done a lot more thinking about quilting, than actually quilting.


Here's the little sis' holding the quilt requested from the older sis'

So here are my thoughts:

1. I thought about my blog and what I REALLY want from it.

2. Then I thought about my style and how I approach quilting.

3. Then I OVER analyzed my abilities and came up with a list of shortcomings.

4. Then I felt inadequate and subsequently unsure of myself.

5. Then came the loss of my desire to sew.  It was painful to even think about sewing.

I'm not the only one who faces these "quilt mind demons," right?  Why do we let this happen to ourselves?  We need to be critical of our work to improve, right? Why do we let comparison or critics be the thief of our joy?

When you feel burnt out and unconfident, what do you do to rise above the quilting blues?

I took a break from sewing and from my quilt blog reading (I really do love you all, but I needed a complete separation).  Who could concentrate on finding peace when you have all of those wonderful pictures and projects to see and read about?  You all continue to amaze me!

I'm slowly getting back into sewing.  The request from my sister came at a good time and a simple quilt project is what I needed.  I also joined a Friday Night Sew Along group on Instagram (#fridaynightsewalong) and the support from my fellow quilters boosted my sewing confidence.  Thanks Sarah of Sarah Quilts!


Seriously, who doesn't love all the quilters?  We have such a wonderful community and I'm so grateful to have the opportunity to get to know everyone.

Wednesday, April 2, 2014

Handstitching

To hand-quilt or to machine quilt, that is the question...


I find that this is an interesting question to ask quilters.  There are some who enjoy the hand-quilting and believe this to be the best way, while others love the speed and consistency or "look" of the machine quilting.  Some quilters are more passionate than others with their opinions.

For me, I enjoy the hand-quilting, but can only get myself to do it every four quilts or so.  And sometimes I only do it when I have a tight deadline.  Wait, isn't hand-quilting supposed to take longer?  Sometimes yes, but my trusted quilter tends to have a 3-4 turn around and sometimes a girl does not have that scheduled into her timeline. 


This weekend I started hand-quilting an adorable project for my niece.  She is turning eight and in my faith, it's a big milestone.  As a part of this milestone, my sister asked for a quilt...with a short timeline.  The result is a simpler quilt that I'm excited to share, but I'm waiting on finishing the hand-quilting first!


The quilt features some of the Wee Wander fabric along with prints from my stash.  To make the quilt more snuggly, I used a "flamingo" colored minky for the backing.  The coral color lent itself well to some pearl cotton and I'm now off to the races.

By the way, it's a little tougher to hand quilt through minky...just an fyi.

Crossing my fingers I can get this hand-quilted this weekend!

Thursday, March 20, 2014

Alive Alive Alive: Quilting Priorities

My husband enjoys taking long bicycle rides in the mornings before he heads to school and on Saturdays.  Sometimes he takes a bit longer than expected, but he always texts or calls me "Alive! Alive! Alive!" when he arrives home safely.

So quilters, I'm alive! alive! alive! and have arrived in my new home safely.  There's still a lot of unpacking to do, but I made sure I had my priorities straight:

 
Design Wall is wrinkled, but up!
 
I can't begin to describe how wonderful it is to have something "pretty" on the walls while we unpack.  It gives me a sense of accomplishment and a huge boost of motivation to unpack.  I need to make room for the sewing machine!
 
Hope you all are doing well and are "alive!"

Thursday, March 6, 2014

Finished: April Showers Plus Quilt

Yes!  It's finished!


It features fabric from Bonnie & Camille's April Showers line and several low volume prints (including my coveted chicken wire fabric).  The circular quilting compliments (at least I think so!) all of the right angles in the quilt.


Backing is a crossword print I found on clearance!  Yay for cute backings that are awesome!


I was tempted to wait for yardage so that I could get the navy bias stripe for the binding, but the solid navy stole my heart.  Love how it gives an edge to the quilt.

Quilt measures roughly 52" x 60".  Quilting done by my LQS, Cutting Edge Quilts and the quilting design is called "Champagne Bubbles"

Wishing you a wonderful weekend!

Best, Kate

PS.  Anyone else use PicMonkey?  I love it, but it no longer supports my browser... and I didn't feel like upgrading tonight... please don't steal my pictures :)