Whaaaaaat?!? I have followers? Sweet!
Was my reaction when I claimed my blog over at bloglovin'. Seriously, it was so exciting! Thank you all for the wonderful boost!
Now onto two unrelated topics:
- Bought my plane ticket for The Sewing Summit in September! Anyone else going??? Click on the picture for a link to the website.
- Getting ready to go camping next week and a few weeks ago I bought this in anticipation:
I LOVE it! It was (seriously) the best thing to find in the mail today. I've been doing all sorts of preparation for the trip and it was starting to get me stressed. (Planning a family camping trip is one thing, but I'm helping plan one for a gaggle of teenage girls) Then this "Keep Calm" hoodie arrived in the mail and I was inspired.
Now back to packing glow sticks, first aid kits, and plenty of Dr. Pepper, or errr... water!
Tuesday, June 18, 2013
Thursday, June 13, 2013
QMQ Butterfly Block Tutorial
A big thank you to Jolene over at Blue Elephant Stitches for giving me permission to put together this little tutorial!
Today I'm going to show you how I used Blue Elephant Stitches Granny Square Quilt Block tutorial to make a butterfly block.
For the purpose of this tutorial, I am using 1/4" seams.
FABRIC REQUIREMENTS:
DIRECTIONS
If you've used Jolene's tutorial before, you'll notice you have two extra white squares. Layout your fabrics similar to the below picture to form the butterfly wings.
For the first part of the tutorial I'll direct you over to Blue Elephant Stitches. Please note for this tutorial I used 2" squares in lieu of the 2-1/2" squares in the tutorial (what can I say, I had a LOT of 2" strip scraps).
Follow the directions to complete the full block, including the trimming (if you so desire, the next part does not require the block to be trimmed, it's just how I did it).
-------------
Next rotate the block similar to the below picture. Use scissors, or rotary cutter, to cut block in half.
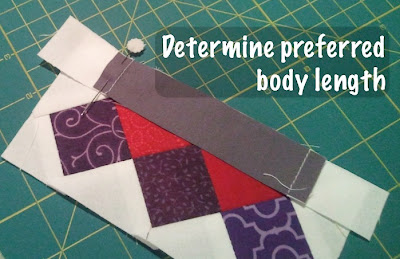
Next take your strip of gray (determine if 5" - minus the 1/2" from the seams - is a good length or if you would prefer something shorter) and sew one of the 1" wide solid strips to each end of the gray strip. Iron seams open if you wish.
It's ok if the white fabric goes beyond the footprint of the butterfly block. You could trim it now or later depending on your preference. I chose to wait until the body was sewn to the wings so that I could adjust the position of the body
Take one of the butterfly (or one wing!) halves and line up the body of the butterfly so that it is centered with the wing. Pin in place and sew. Press seams. Repeat with the other butterfly half. Press open. Trim / square block as preferred.
And there you go, a pretty cute butterfly block, if I do say so myself :)
As a little end note, several butterfly blocks recommend stitching "antenna," but I'm still working on my stitching skills so I opted to not add any to my block.
If you have any questions or need me to clarify anything, please shoot me an email at quartermilequilts@gmail.com I am new to writing tutorials and would appreciate the feedback!
And again, thanks to Blue Elephant Stitches for allowing me to write this tutorial!
Today I'm going to show you how I used Blue Elephant Stitches Granny Square Quilt Block tutorial to make a butterfly block.
For the purpose of this tutorial, I am using 1/4" seams.
FABRIC REQUIREMENTS:
- 11 - 2" (inch) squares of the "butterfly wings." For a true butterfly look I would recommend having 5 (five) matching pairs of fabric, with one fabric for the center of the wings.
- 14 - 2" (inch) squares of the solid (I used white in this tutorial)
- 1, 1" x 5" strip of the solid (again, I used white). Cut in half.
- 1, 1" x 5" +/- of gray or black fabric (depending on how long you like your "butterfly body," I used 4.5", but wanted to give you the option of a longer look). We'll be adding the solid to each end of the block, so you'll lose roughly 1/2" on the length.
DIRECTIONS
If you've used Jolene's tutorial before, you'll notice you have two extra white squares. Layout your fabrics similar to the below picture to form the butterfly wings.
For the first part of the tutorial I'll direct you over to Blue Elephant Stitches. Please note for this tutorial I used 2" squares in lieu of the 2-1/2" squares in the tutorial (what can I say, I had a LOT of 2" strip scraps).
Follow the directions to complete the full block, including the trimming (if you so desire, the next part does not require the block to be trimmed, it's just how I did it).
-------------
Next rotate the block similar to the below picture. Use scissors, or rotary cutter, to cut block in half.
Next take your strip of gray (determine if 5" - minus the 1/2" from the seams - is a good length or if you would prefer something shorter) and sew one of the 1" wide solid strips to each end of the gray strip. Iron seams open if you wish.
It's ok if the white fabric goes beyond the footprint of the butterfly block. You could trim it now or later depending on your preference. I chose to wait until the body was sewn to the wings so that I could adjust the position of the body
Take one of the butterfly (or one wing!) halves and line up the body of the butterfly so that it is centered with the wing. Pin in place and sew. Press seams. Repeat with the other butterfly half. Press open. Trim / square block as preferred.
And there you go, a pretty cute butterfly block, if I do say so myself :)
As a little end note, several butterfly blocks recommend stitching "antenna," but I'm still working on my stitching skills so I opted to not add any to my block.
If you have any questions or need me to clarify anything, please shoot me an email at quartermilequilts@gmail.com I am new to writing tutorials and would appreciate the feedback!
And again, thanks to Blue Elephant Stitches for allowing me to write this tutorial!
Saturday, June 8, 2013
Claiming my Blog with Bloglovin'
<a href="http://www.bloglovin.com/blog/5017501/?claim=2qjtqpd6rqu">Follow my blog with Bloglovin</a>
Just a quick little post to note I've joined the world of Bloglovin' :)
Just a quick little post to note I've joined the world of Bloglovin' :)
Friday, June 7, 2013
Finished! Rain or Shine
Last weekend I finished the binding on my Rain or Shine quilt!
This time I used a local quilt shop for my long arm needs. The thread color is Dolphin in a Pansy pattern. I love how the quilting does not overpower the quilt. It can still shine! (And yes, I realize that I am being cheesy in my reference to the pattern name - hehe).
This is one of the first quilts that I have used gray as the neutral and I must say that it is still growing on me. I have always loved the use of white as my neutral (a feeling similar to the emotional tie of comfort food!). Anyone else feel this way?
Linking over at Richard and Tayna's Link a Finish Friday :)
Sunday, June 2, 2013
Inspiration All Around Us - Butterflies
As a quilter and some-what creative person, I usually depend on the creativity of others to inspire me. I'm a copy-cat who gives full credit to her inspirers. For example, fabric gives me all sorts of inspiration and I like to credit the designer for that stimulation.
Today's inspiration comes from one of my work projects. As some of you know, my "full-time" job is working for a construction company as a project manager. One of our latest projects involves butterflies. Yes, butterflies! And for part of the decor, the client used beautiful butterfly mosaics.
Today's inspiration comes from one of my work projects. As some of you know, my "full-time" job is working for a construction company as a project manager. One of our latest projects involves butterflies. Yes, butterflies! And for part of the decor, the client used beautiful butterfly mosaics.
I'm really sad that I didn't have my nice camera, but the cell phone quality will have to do!
I used the flash in an attempt to catch the irridescent quality of the wings. So beautiful. It makes me want to sew a whole bunch of butterfly blocks!
I did a few searches and the following blocks stood out to me:
This tutorial from Four Wise Monkeys:
And of course, this is just the tip of the ice-berg for Butterfly quilt blocks.
I used some extra squares from my Granny Square quilt from Blue Elephant Stitches' tutorial here and created this cute butterfly using the same techniques published by Blue Elephant Stitches.
I think a butterfly quilt may be in my future :)
If I have linked your tutorial or image and you would like it removed, please feel free to contact me.
Subscribe to:
Posts (Atom)


